
Building My New Kiln
When I set up my studio here outside Ferndale, WA back in the 1980's, I chose to set up with just a small stackable updraft gas kiln for my cone 11 firings. I had a larger kiln that I brought out to the property, but I was reluctant to install it inside the old cedar barn that I had restored for use as a kiln shed. While I am eager to follow in the footsteps of potters such as Bernard Leach in many areas, I have no desire to join him on the list of potters who have burnt down the barns that housed their kilns. Once I had made the decision to go with a small kiln to start, I found it easy to put off the building of another one that would serve me better. When I started hosting Vince Pitelka's workshops back in 1997, Vince was very complimentary about the work that I was producing, but he was clearly appalled that I did not have more adequate firing facilities. |
||||
| Click on a thumbnail to view a larger image. | ||||
 |
 |
 |
||
First I had to clear the sod to prepare for the slab to place the kiln on. |
The completed slab and steel canopy, right behind my studio. |
The first module of welded angle iron frame. |
||
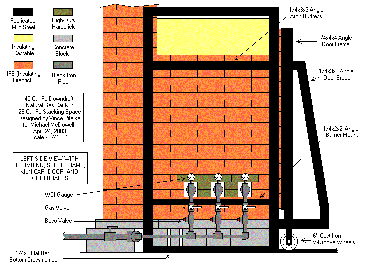
| Thanks to his gentle prodding I finally was able to verbalize what would be the characteristics of my "Dream Kiln" given the parameters of my current studio and style of work. Once I was able to say what I wanted, Vince set himself the task of designing it for me. He has been very helpful in guiding me through the process of building this kiln myself. This has probably turned out to be more of a project than he had expected though, since I was determined that I was going to go through the process of getting permits for the whole project. Whatcom County has a reputation for being among the most stringent and difficult places to get permits to do anything, and a "homemade" gas kiln that they classed as an "industrial high-heat appliance" in a residential zone was not an easy thing to get by them. There were essentially two different permit processes required. First the "use" had to be permitted within my zoning, then I could apply for permits to construct the kiln. |
||||
| Click on a thumbnail to view a larger image. | ||||
 |
 |
 |
||
Base of the kiln is laid, a layer of concrete blocks. |
The concrete blocks were capped with a layer of patio blocks trimmed to make a continuous pad for the brickwork to come. |
The first layer of insulating firebrick insulation for the floor of the kiln. |
||
| The summer of 2002 was given over to the zoning issue. I was able to get my property classed as "Cottage Industry", a "Conditional Use" that allows small scale non-intrusive commercial use of residential property. Without such a designation I was prohibited from even having a kiln any larger than the one I currently use. Now that I had dealt with the zoning issue, I was free to submit plans for the new kiln, there was just one unexpected new development. I found out that I had a brain tumor! |
||||
| Click on a thumbnail to view a larger image. | ||||
 |
 |
 |
||
A second layer of insulating brick is laid for the floor. |
Finally a third layer of bricks completes the floor and the base of the walls. |
It was at this point that my friend Jerry Bajema began to pitch in, matching my effort daily for weeks now. |
||
| The tumor was diagnosed in December of 2002, and operated on in early January 2003. It was large, but benign, and recovery, though still not complete, is expected to be nearly total in time. In the end I will have only lost the hearing in my right ear. But for some months after the operation it looked like I was going to lose my home and studio as well in order to raise the money to pay the medical bills. I had insurance, but with a very large deductible. And there were so many loopholes to get the insurance policy off the hook for this and that it looked like I would have to cover the major portion of nearly $100,000 in expenses. At this point the kiln plans seemed pretty remote, but within another few months, things had turned around such that they seemed imperative. |
||||
| Click on a thumbnail to view a larger image. | ||||
 |
 |
 |
||
The first three courses of the walls set burner ports and the flue opening to the chimney |
We had to redo this to use the darker, denser hardbrick throughout the inner course . |
Now midway up the walls. You can see how hardbrick is used at the level where flame will enter and fumes leave the kiln. |
||
| Insurance paid off for me not so much for how much they paid out, but for the discounting of the original bills through their provider network. So I could keep the house and studio and still had a little savings, just no income while I recuperate. For the last several years I have been relying on my occasional employment to clean up hazardous waste spills, primarily in marine environments as my primary source of income. At this point it is not certain that I will regain enough of my balance to resume that physically demanding occupation. It now looks as though I had best be prepared to once again make pottery my main income source. To do that I definitely needed more adequate firing facilities. So the plan to build a new kiln was on again. |
||||
| Click on a thumbnail to view a larger image. | ||||
 |
 |
 |
||
Brick by brick the walls grow higher. Here's proof that I actually did some of the work. |
Finally we reached the top of the side walls where we needed to place this free floating angle iron that serves to hold in the outward pressure of the arched top. The "arch buttress." |
At this level the outer course of bricks had to be trimmed to "inlay" the arch buttress, while the inner course had to be trimmed to support the angled orientation of the first course of the arch |
||
Vince completed design illustrations in April of 2003, and I began the process of getting the required permit. This process was very tedious and drawn out, but so it is with bureaucracy. I was required to submit engineering studies of both the structure of my kiln and it's enclosure, as well as the combustion system. I was lucky to find a sympathetic and supportive engineer, with both the required structural and mechanical licensing, who did the work quite reasonably, and then purchased enough of my work to restore the capital I would need to build the kiln. He was not alone in generously stepping forward to help me out with this project. Many among my base of friends, family, and customers have similarly responded, and it's only with thanks to them that I can report progress in this area. |
||||
| Click on a thumbnail to view a larger image. | ||||
 |
 |
 |
||
At last the bricks were ready for the arch. But first a form had to be made to support the arch while under construction. |
With the arch form in place the arch bricks were built up in matching courses from either side. |
Now that the arch is completed the wedges holding up the form can be removed and the form withdrawn. |
||
| It was late June by the time I was able to get all the documents and studies together to formally submit my permit application. Then began the most tedious part of the whole process. I simply had to wait while the bureaucracy mulled over my request. Having had more than one plan fall through at this point in the past, I didn't feel it would be wise to purchase any of the required materials until I was sure I would be allowed to follow through. The wait was interminable, but I did find things to do. Around August I found that I was recovered enough that I could begin to work on the potter's wheel again. I managed to refresh much of my old skill and even advance the evolution of some of the forms I had been working on before the operation. At last, in early September, the permit was approved. |
||||
| Click on a thumbnail to view a larger image. | ||||
 |
 |
 |
||
When the arch form is dropped, the arch remains, supporting itself now. It looks precarious, but you could walk across it. |
Probably the toughest brick trimming job was carving the bricks to fit under the arch and close the back wall. |
Next the chimney had to be built up through the roof. |
||
| Now with summer nearly gone I was able to begin the actual physical work of putting the kiln together. Lucky for me the dry days held on long enough to get the slab poured and the carport awning erected so that I had a sheltered job site to house the brick when it arrived. The first module of the kiln frame had already been delivered, so on the 30th of October I finally started laying the block for the base of the kiln. I see now that it's been just three weeks. Construction has been carried a little further in that the welder has now brought the frame for the car that carries the bed and door of the kiln on rails, and I've spent the last three days working with Vince via e-mail in Tennessee while travelling to Tacoma twice to get my burner assemblies configured properly. I'll continue the story on another page as we brick up the car and finish the plumbing. Boy it's getting cold! |
||||
| Click on a thumbnail to view a larger image. | ||||
 |
 |
 |
||
Jerry was kind enough to do most of the work up on the roof . Here he's laying the last of the chimney bricks in the angle iron framework. |
Then he put flashing material over the exposed brick, and over the gap between chimney and roof. |
Here Jerry puts the finishing touches on the layer of castable refractory that covers the brick of the arch. |
||
| Next Page | ||||
| |
||||