
Building My New Kiln, Continued
It was tempting to set right to work on bricking up the car once it had arrived, but the welder who brought it also brought an offer to help with plumbing the gas. I would have to do the actual connections to satisfy code restrictions. I had been planning on doing that anyway. But I was not about to turn down a offer of help laying it out, cutting and threading the pipe, and best of all purchasing parts at substantial discounts through his employer. Problem was, he was leaving for Thanksgiving vacation at the end of the week so he would only have Monday, Tuesday and Wednesday evenings after work to help. As I didn't have the burners on site yet, I had to plan a trip to Tacoma to pick up the burners on Monday during the day to have them ready for him on Monday after work. |
||||
| Click on a thumbnail to view a larger image. | ||||
 |
 |
 |
||
Now the frame for the car has arrived. This will hold the loading bed and door. The steel wheels and rails allow it to be loaded outside the kiln and then rolled in to fire. |
The car is rolled into the kiln in preparation for bricking the bed. |
After troweling on a thin coat of mortar on top of the steel deck, the IFB bricks are laid tight against the existing brickwork. Only a layer of wax paper keeps the two separate. |
||
| It's about 130 miles from my home/studio to Clay Art Center, in Tacoma. A challenge I took on with some hesitation because I hadn't pushed my long distance driving since my operation. Though I'd been driving for months now I hadn't gone more than the ten miles into Bellingham. The drive turned out to be easy enough. I timed it to avoid both the morning and evening rush in the Seattle/Tacoma area. I got home in plenty of time to fire off a photo of my prize to Vince. Good that I did, because Vince messaged me right back that the burners were assembled all wrong. Joe at Clay Art Center had done his best to make the burners look like Vince's design illustration. But Vince had not really depicted the actual burner/pilot configuration. We hadn't even decided what kind of pilot burner to get when he drew up the plans. After a series of e-mails and phone calls between the three of us, it was decided that the best solution was for me to bring the burners back to Tacoma to be re-configured according to Vince's now explicit specifications. Joe was very gracious about dropping all his other concerns and working non-stop with me on the burner rebuild so that I was able to return that afternoon with the burners done right, saving me yet a third trip down there. But by now, it was too late to take advantage of the welder's help with plumbing. I decided to wait until he returns on December 1st. That really won't be a problem now as I find that the gas co. won't be able to give me the larger meter I need until the week of the 8th. |
||||
| Click on a thumbnail to view a larger image. | ||||
 |
 |
 |
||
First layer is followed by a second. All the porous IFB's are first soaked in water, then painted with a thin coat of fireclay mortar as they are laid in place. |
The bricks are soaked so they won't draw moisture from the mortar too quickly. Still mortar is applied to adjoining surfaces only when a brick is ready for the spot. |
Here the last brick on the second layer, freshly painted with fireclay mortar is set into place. |
||
| So now it was time to address bricking up the car. That process is well illustrated on this page. But there were problems that are not shown here. Jerry came and helped me and we made good progress on Thursday. By the time the light failed us we had the first two layers on the bed and a start on the third. On Friday I had to take a day off to tend to my duties at the local Allied Arts Holiday sale. The weather turned very cold on Friday. We had been soaking each softbrick with water prior to setting it to keep them from sucking the moisture out of the mortar. When Jerry and I got set to return to it about 11 AM Saturday morning, the bricks were all coated with a layer of the ice that had formed. Jerry spent a good hour heating that surface up with a hair dryer while I sawed up the half bricks we would need to stagger the brick courses in the door. When we finally got through with the bed, laying the brick in the door went quite fast. There was only one layer of brick to lay. They would be dry stacked, no mortar, as it was everywhere but the floor, and I had already prepared all the half bricks. We found we would still need to trim about 1/4 inch of one brick in each row to fit the frame. I got started sawing bricks, and Jerry laid a course as fast as I could get one shortened brick ready. We were racing to get done so I could go put the yams in the oven and get started on our celebratory steak dinner. Once the last brick was in and the bolts were all tightened to hold them in place we just left everything where it was and walked up to the house to start partying. It wasn't till the next day as I was cleaning up after us that I discovered the cart would not roll all the way in. The arch bricks stopped against the door more than a half inch before the door closed up against the sides. |
||||
| Click on a thumbnail to view a larger image. | ||||
 |
 |
 |
||
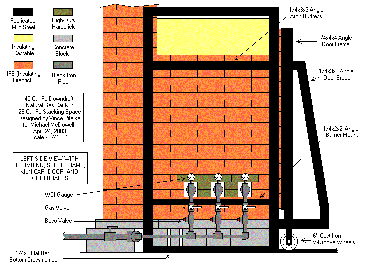
For greater resistance to the heat, abrasion, and uneven weight distribution of kiln shelving and pottery, hardbrick is used for the top layer of the car bed. |
Here's the finished bed of the car. We had to put in a couple of "racing stripes" of IFB to fill out the space, carefully placing them away from areas where posts will hold up shelving. |
The bed done, we now started bricking up the door. The bolts running up the side of the door frame will tighten against a flat steel bar inside the frame to hold everything in place. |
||
| I shouldn't have been surprised at this, though I was. The steel frame had been made just a little bit small. We had had to trim a brick in every course in order to fit within the frame. But the arch didn't have to be fit into the metal, and we had blithely erected it without checking or trimming any of the bricks to align them with the sides of the opening. So I had set myself up for a very dusty task to correct this situation. I had a lot of material to remove. About 5/8" off the end of every course of arch brick. I suppose I might have tried to get a saw started straight at one end and sawed across the whole arch, but the method I chose was to put a very coarse belt in my belt sander, and sand off a bit at a time checking periodically by trying the door. It actually went pretty fast this way. I was lucky I didn't go too fast. By the time the arch was no longer the first thing that stopped the car, I could see that the door was misaligned with the opening. It came up against the bricks in the upper left hand corner, but was still about a half inch out at the bottom on the left side. The right side had about 1/2" gap all the way up narrowing slightly at the top. It was time to call Vince. |
||||
| Click on a thumbnail to view a larger image. | ||||
 |
 |
 |
||
With the door bricks all in place I am now tightening the bolts to push the flatbar firmly against the brick. These guys won't go anywhere. |
As a precaution against the extra heat expansion of the hardbricks, Vince had us go back and create a little gap between the bed and door on the top layer. |
Here you can see how neatly the brick overlap of the shell of the kiln match up with the layers of brick on the car. A slight wedge shape to the bed allows it to be removed, yet seal tightly when fully pushed in. |
||
| Vince's design actually made it fairly easy to make adjustments to the positioning of the door. By having it bolt to the car frame instead of welding it in place. I simply had to undo a couple of bolts at a time while just slightly loosening the others. I could then make slight adjustments, clamp them in place and re-drill the bolt holes. This cured most of the problem. Then Vince talked me through the process of fine tuning the door fit by pushing the cart in as far as it would go, probing all the way round the opening with a piece of posterboard, and then sanding those areas of brick down where the posterboard wouldn't fit. Then I would repeat that process until it finally fit close all the way round. Now the door seems to fit pretty well. Firing the kiln will be the final test of door fit. If flame escapes through seams as yet unfound then I'll go round with the posterboard a couple more times. Or another approach he offered would be to build up a low area with a thin layer of kiln patching mortar, cover it with waxed paper and close the door on it till the mortar sets up. We'll see if I need to get that trick out of the bag when I fire the kiln. |
||||
| Click on a thumbnail to view a larger image. | ||||
 |
 |
 |
||
The brickwork of the kiln shell is now complete. At this point Jerry and I sat down to a well deserved steak dinner. |
Here's a close-up showing the latch that holds the door closed. Once the kiln is very hot, expansion actually locks the car in place. But you can't be too safe. |
A bagwall of hardbricks deflects the flame as it enters from the burners up toward the top of the kiln |
||
| By the time we had the car all bricked up and the instruments (Oxyprobe and Pyrometer) mounted, Brian the welder who had promised to help with the plumbing was back from his vacation. So we set to work on the plumbing of the burners. It wouldn't have been too big a job but the inspector wanted to check on the integrity of the whole supply line from the meter to the kiln, even though most of that had been installed and approved years ago. As I had been using a branch off this line to supply my old kiln out in my barn, there were several hundred feet of buried pipe to check. When the overall system would not hold pressure on a test we had to check out the whole works for leaks. This got me started digging out all the joints in the system so that we could check them for leaks. Once it was done I was thankfull, for we found several leaks. Not all of them were small either. But it did slow the project down. It was already past New Year's by the time we got the final approval of the burners and were ready to fire the kiln. Then I had to get back in gear and make some pots to fire in it. |
||||
| Click on a thumbnail to view a larger image. | ||||
 |
 |
 |
||
After all the problems with burner configuration and supply line leaks have been solved, they are finally ready to go. |
First load going in to kiln. Nothing too precious til I find out how this thing fires |
First load finished. Results are mixed, as expected. Next fire should be great! |
||
| |
||||